Are you tired of encountering dead ends and frustrating error messages while browsing the web? Well, get ready to bid farewell to those exasperating moments because we have a game-changer for you: URL redirection. It’s like having your very own digital GPS that ensures every click you make leads you straight to your desired online destination.
In this guide, we’re going to unravel the mysteries of URL redirection and make it crystal clear why it’s a must-know concept for anyone navigating the digital realm. No jargon, no complicated technicalities – just straightforward explanations and practical tips that will empower you to redirect URLs like a pro.
Ready? Let’s dive in and discover how to redirect a URL in WordPress!
What is URL Redirection?
URL redirection, also known as URL forwarding, is the process of directing a user from one web address (URL) to another. It is a technique used to ensure that when a user clicks on a specific URL, they are automatically redirected to a different URL, typically to a new location or destination.
URL redirection serves multiple purposes in the digital landscape. It allows website owners to manage changes such as rebranding, domain changes, or restructuring their website’s content without breaking existing links or causing inconvenience to users. It also helps to maintain search engine rankings by preserving the authority and relevance associated with the original URL.
Types of URL redirects:

There are two primary types of URL redirection:
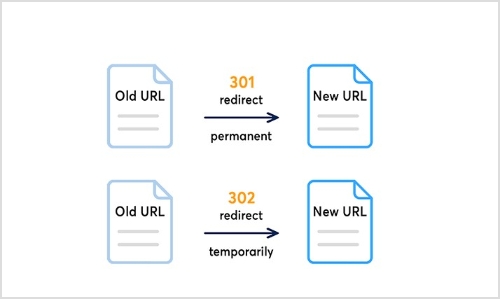
Permanent redirect (HTTP 301):

This type of redirect indicates that the original URL has moved permanently to a new location. It informs search engines and web browsers that the new URL should be considered the main and preferred address for the content. Permanent redirects are commonly used for situations like domain changes or when merging multiple web pages into a single page.
Also read: How to Change Permalink in WordPress: Step-by-Step
Temporary redirect (HTTP 302):

Temporary redirects are used when the original URL is only temporarily unavailable or has moved to a different location for a short period. It instructs web browsers and search engines to visit the new URL temporarily, while still recognizing the original URL. Temporary redirects are often used during website maintenance or when testing new pages before making them permanent.
Other unusual redirects include:
Besides the commonly used permanent redirect (HTTP 301) and temporary redirect (HTTP 302), there are a few other types of redirects that serve specific purposes. These include:
303 see other:
This redirect is similar to the temporary redirect (HTTP 302) but has a specific meaning defined in the HTTP protocol. It indicates to the browser that the requested resource can be found at a different location, and the response to the redirected request should be a GET method.
307 temporary redirect:
This is another type of temporary redirect, similar to HTTP 302. It indicates to the browser that the requested resource has temporarily moved to a different location. However, unlike HTTP 302, the browser should continue to use the same HTTP method (e.g., POST) for the redirected request.
308 permanent redirect:
Similar to the permanent redirect (HTTP 301), the 308 status code indicates that the requested resource has permanently moved to a new location. The key difference is that the browser should use the same HTTP method (e.g., POST) for the redirected request, whereas HTTP 301 may convert a POST request to a GET request.
These additional redirect types (303, 307, and 308) have specific use cases and are less commonly utilized compared to HTTP 301 and HTTP 302 redirects. The choice of which redirect type to use depends on the specific requirements of your website and the desired behavior for the redirected requests.
How to redirect a URL in WordPress?
To redirect a URL in WordPress, you can use either a plugin or modify the .htaccess file. Here are two methods you can follow:
Method 1: Using a WordPress redirection plugin
Step 1: Install and activate a redirection plugin

Go to your WordPress dashboard, navigate to “Plugins” > “Add New,” and search for a redirection plugin such as “Redirection” or “Yoast SEO.” Install and activate the plugin of your choice.
Step 2: Set up the redirect
Once the plugin is activated, go to the plugin’s settings or options page (usually located under “Tools” or “SEO” in the dashboard menu). Look for a section related to URL redirection or redirects.
Step 3: Add a new redirection rule
In the plugin’s settings, you should find an option to add a new redirection rule. Enter the old URL (source) and the new URL (target) where you want the redirect to point. Choose the appropriate redirect type (301 or 302) as needed.
Step 4: Save the redirection rule
After filling in the necessary details, save the redirection rule. The plugin will handle the redirection, and when someone accesses the old URL, they will be automatically redirected to the new URL you specified.
Also read: How To Change A URL Of Any Website?
Method 2: Modifying the .htaccess file
Step 1:Access your website’s files
Connect to your website’s hosting account using FTP (File Transfer Protocol) or access the file manager in your hosting control panel.
Step 2: Backup the .htaccess file
Before making any changes, it’s important to create a backup of the existing .htaccess file in case anything goes wrong. Simply download a copy of the .htaccess file to your local computer.
Step 3: Edit the .htaccess file

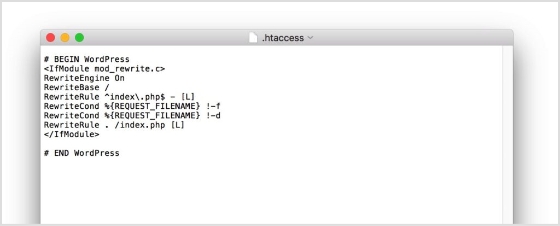
Open the .htaccess file using a text editor. Add the following code at the beginning or end of the file, depending on your preference:

Replace “/old-url/” with the actual URL slug or path of the old URL you want to redirect, and “http://www.example.com/new-url” with the desired destination URL.
Also read: URL Hijacking Uncovered: A Complete Guide to Protecting Your Online Presence
Step 4: Save and upload the modified .htaccess file
Save the changes to the .htaccess file and upload it back to the root directory of your WordPress installation, overwriting the existing file.
Step 5: Test the redirection
Visit the old URL in your web browser and verify that it correctly redirects to the new URL you specified. If the redirection is working as expected, you have successfully redirected the URL in WordPress.
Remember, modifying the .htaccess file requires caution, as any mistakes in the code can cause issues with your website. Make sure to double-check the changes and keep a backup of the original .htaccess file for safety purposes.
Why you should create a redirect?
There are several scenarios in which you may need to create a redirect. Here are some common situations where redirects are useful:
1. Rebranding or website restructuring:
If you undergo a rebranding process or make significant changes to your website’s structure, you may need to redirect old URLs to their new equivalents. This ensures that users who access the old URLs are seamlessly directed to the updated content.
2. Changing domain names:
When you change your website’s domain name, it’s essential to set up redirects from the old domain to the new one. This preserves your website’s traffic, and search engine rankings, and ensures that visitors who may have bookmarked or shared your old URLs are still able to access your content.
3. Handling outdated or expired content:
When you remove or archive certain pages or posts on your website, you can create redirects to guide users to relevant and up-to-date content. This prevents visitors from encountering dead ends or 404 error pages and helps maintain a positive user experience.
4. Managing affiliate or marketing campaigns:
If you’re running specific marketing campaigns or affiliate programs that involve unique URLs, you might need to create redirects to track and direct visitors to the intended landing pages. This allows you to monitor campaign performance and ensure visitors land at the correct destination.
5. Correcting broken or mistyped URLs:
If you discover broken or mistyped URLs on your website, creating redirects can fix these issues. By redirecting the incorrect URLs to the correct ones, you can ensure a smooth browsing experience for your users and prevent them from encountering frustrating dead ends.
Remember, redirects are powerful tools that can help you maintain website functionality, improve user experience, and preserve SEO efforts. Whenever you make changes to your website that impact URLs, consider whether a redirect is necessary to ensure a seamless transition and to guide users and search engines to the right content.
Also read: How to Make a Url Link in Word?
Final words:
In the vast realm of the internet, URL redirection is the key to unlocking seamless navigation and preserving your online presence. By mastering the art of redirection, you can ensure a flawless user experience, maintain search engine rankings, and adapt to changes with ease.
Whether you’re rebranding, restructuring, or simply seeking to enhance your website’s performance, redirecting URLs is your secret weapon. So, embrace the power of redirection, navigate the digital landscape with confidence, and watch as your online presence soars to new heights. Get ready to redirect your way to success!
FAQs
FAQs
What is the difference between a permanent redirect (HTTP 301) and a temporary redirect (HTTP 302)?
A permanent redirect (HTTP 301) informs search engines and browsers that the original URL has permanently moved to a new location. A temporary redirect (HTTP 302) indicates a temporary move or change. It’s important to choose the appropriate type depending on the situation.
How can URL redirection impact my website’s search engine rankings?
URL redirection can impact search engine rankings by preserving the authority and relevance associated with the original URL. If implemented correctly, redirects can transfer link equity and prevent loss of traffic and rankings when URLs change or move.
Can I implement URL redirection without a plugin?
Yes, you can implement URL redirection without a plugin by modifying the .htaccess file on your server. This method allows you to set up server-side redirects using rules defined in the .htaccess file.
Are there any SEO best practices to consider when setting up URL redirects?
Yes, when setting up URL redirects, it’s important to ensure that the redirect is a one-to-one mapping from the old URL to the new URL. Additionally, update internal links and notify relevant parties to update their references. Monitor and maintain redirects to address any issues promptly.
How do I test if my URL redirection is working correctly?
To test URL redirection, simply access the old URL and verify that you are automatically redirected to the new URL. Test on different devices and browsers to ensure compatibility and functionality.
What should I do if I encounter redirect loops or broken redirects?
If you encounter redirect loops or broken redirects, review your redirect configurations and ensure they are set up correctly. Check for any circular redirections or incorrect rules. Make necessary corrections and retest the redirects.
Is it possible to redirect multiple URLs at once?
Yes, it is possible to redirect multiple URLs at once. In WordPress, you can use a plugin that supports bulk or wildcard redirects. Alternatively, with server-side redirects, you can set up rules in the .htaccess file to redirect multiple URLs simultaneously.
You may also like:
How to automatically shorten URLs in an RSS Feed
What Is a Permalink? How Does It Impact SEO Ranking?
Step-by-Step: How to Get a Custom YouTube URL
How to Convert video too Link?


