There’s nothing more frustrating than realizing that your short link is leading your audience to the wrong landing page for your amazing campaign. Whether it’s a broken page or a campaign pivot, the need to change destination URLs can feel like a headache you don’t need.
Luckily, with Replug and its powerful link management features, you don’t have to stress about that anymore. With just a few clicks, you can update the destination URL of your short links without breaking a sweat.
In this guide, we’ll walk you through the process to change destination URL in Replug, making it easier than ever to keep your links fresh, relevant, and effective.
Let’s get started!
What is a destination link?
A destination link is the landing page where users end up after clicking your short link. Think of it as the final stop in their journey.
With link-shortening tools, you can easily change destination URL at any time, and it doesn’t need to be the same as the initial URL.
How to change your destination URL?
This is how you can change destination URL using Replug’s link rotation feature:
Step 01: Log into Replug
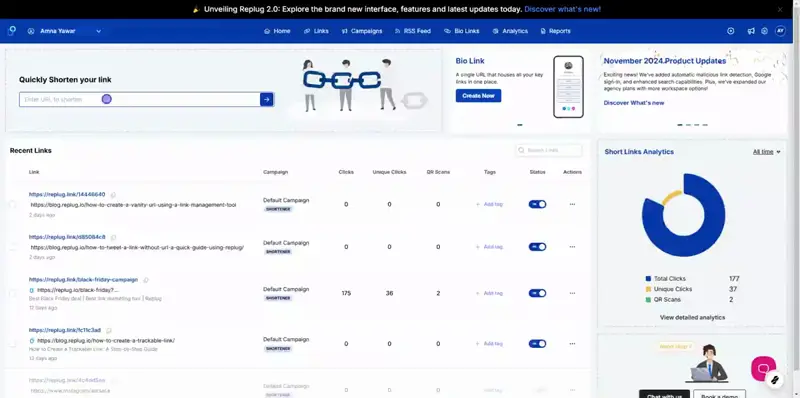
Start by signing into your Replug account. New here? You can try out all the features with a 14-day free trial. Once you’re in, let’s get started
Step 02: Create a Smart Link
- From your dashboard, click on “Create New Link.”
- Enter your primary destination URL. This is the default link users will land on unless a routing rule is applied.

- Once you’ve added the link, hit Enter. A pop-up will appear. From here, choose Traffic Routing Rules to continue.

Step 03: Set Up Traffic Routing Rules
Click on “Add New Rule” to create custom redirection paths based on your audience.
You can set alternate links based on filters like:
- Country
- Device Type
- Browser Language
- Operating System
- Date/Time
- IP Address
You can also edit or delete any rule directly from the dashboard whenever needed.
If you want to edit your URL, here’s a quick way to do it using Replug.
How to edit your destination URL using Replug?
Step 01: Paste the link you want to shorten
Step 02: Click on the next arrow
Step 03: Your shortened link will be generated
Step 04: Click on “Save Shortened Link”
Step 05: Click on “Edit”
Step 06: Change the destination URL (Original URL)
Step 07: Save the new destination URL
Here’s a video to demonstrate the process:

Why change the destination URL?
Changing the destination URL gives you control over your content, ensuring a smooth user experience while maintaining traffic and brand consistency. Here’s why you might need to redirect or change a destination URL:
- Fix errors: Update wrong URLs without creating new links to avoid confusion and maintain functionality.
- Refresh content: Redirect links to updated or seasonal content while keeping the same short link.
- Handle expiry: Point expired links to relevant pages instead of dead ends for a better user experience.
- Protect SEO: Use 301 redirects to retain SEO rankings when changing destination URLs.
- Improve UX: Redirect broken links to relevant pages to avoid 404 errors and user frustration.
- Streamline campaigns: Reuse links for recurring promotions by changing their destinations.
- Support rebranding: Redirect old links to new domains to maintain traffic and rankings.
- Fix typos: Redirect misspelled URLs to the correct page without losing traffic.
- Merge sites: Preserve traffic by redirecting old site URLs to the new one.
- Mobile optimization: Redirect users to mobile-friendly versions for seamless browsing.
Replug goes beyond just changing destination URLs
The list of tools and features in Replug’s link management kit goes way beyond just changing destination URLs. Here are some irresistible ones that you need to try out:
- Generate QR codes: Connect offline and online audiences with custom QR codes for your short links. You can also customize it the way you like!
- Edit link previews: Tailor link titles, descriptions, and images for maximum impact on social media.
- Set expiration dates and password-protect links: For time-sensitive campaigns, protect access with passwords and set expiry dates for your links.
- Smart traffic routing: Direct users based on location, device, or other parameters.
- A/B test your links: Split-test up to 10 versions of the same URL. Set equal or custom traffic percentages to distribute traffic for each destination link.
- Boost conversions with CTAs: Add compelling calls-to-action to drive user engagement.
- Retarget like a pro: Add retargeting pixels to reconnect with visitors via personalized ads.
- Create bio links: Easily generate bio links to share on multiple social media platforms and create stunning bio link pages.
Things to remember before changing a destination URL
Before you change destination URL, consider these quick tips to avoid issues:
- Impact on tracking: A small tweak in destination links can disrupt analytics. Use tools with a link editor to keep data intact.
- Active campaigns: Ensure all campaigns reflect the updated destination link—no broken paths!
- Custom domains & URL shorteners: A custom URL shortener with custom domains makes updating easier without affecting branding.
- Link name changer: Simplify management with a tool that lets you easily edit URLs and rename links.
- SEO preservation: If the old URL has backlinks or SEO value, set up proper 301 redirects to retain rankings when you edit URLs.
- Consistency with branding: When updating, align the new link name changer with your brand voice, especially if using a custom domain.
- User expectations: Ensure the new destination link leads to the expected content, reducing bounce rates and frustration.
- Test, test, test: Always test the updated destination link across devices and browsers to confirm functionality before finalizing the change.
FAQs about how to change destination URL
Can I change the destination URL?
Yes, with Replug, you can easily change your destination URL. Instead of creating a new link, simply use the link editor to edit URLs and update the destination link for your existing short link.
Can a URL be edited?
Yes, you can edit URLs in Replug. After shortening a link, use the link name changer feature to update the destination URL by selecting “Edit” from the dashboard and changing the original URL to a new destination.
Can I change my domain URL?
Yes, you can change the custom domain URL. This process involves updating your custom domain settings in your link management platform.
How to purchase a domain name?
To purchase a domain name, visit a domain registrar like GoDaddy, Namecheap, or Google Domains. Simply search for an available domain, purchase it, and configure your DNS settings for use with your custom URL shortener.
Can URLs be customized?
Yes. You can edit URLs to include a specific link name changer and set a custom domain, making your shortened links more branded and relevant to your audience.
How do I shorten a URL and rename it?
To shorten a URL and change destination URLs in Replug:
- Paste the long URL into Replug’s dashboard.
- Click on the next arrow to generate the shortened link.
- Click “Save Shortened Link.”
- Then, click “Edit” and change destination URL or the link name changer to a more personalized one.
Are URLs permanent?
URLs can be permanent as long as they are not manually deleted or expired. With advanced link management tools, you can edit URLs and update the destination link anytime without generating a new link.
Do URL links expire?
URLs can be set to expire with Replug, allowing you to manage time-sensitive campaigns effectively. You can set expiration dates for your short links to ensure they are no longer accessible after a certain time.
How to create a temporary URL?
To create a temporary URL, simply set an expiration date when creating or editing your short link.


