


Ever clicked on a link that seemed to stretch forever? URL shorteners are the magic wand to that problem.
They transform lengthy URLs into concise, manageable links. Whether you’re running an online business or just love sharing cool stuff, creating your very own URL shortener can be a nifty move.
In this guide, we will show you how to create your own link shortener.
Think of it as creating your own secret link language. Don’t worry, it’s simpler than you might think.
Let’s jump in and start shortening!
What is a URL shortener?
A URL shortener is a tool that takes a long URL and converts it into a shorter one. This can be useful for a number of reasons, such as:
- Making it easier to share links on social media or in text messages
- Reducing the amount of space a link takes up on a website or in an email
- Tracking the number of clicks on a link
There are many different URL shorteners available; some of the most popular ones include Replug, Bitly, and TinyURL.
To use a URL shortener, simply enter the long URL into the shortener’s website. The short URL will be generated. You can then copy and paste the short URL wherever you need to share it.
How to create your own URL shortener?
In this guide, we’ll explore two methods to achieve this: the traditional DIY approach and utilizing a service like white-label Solution.
Method 1: The DIY approach
Creating a custom URL shortener from scratch might sound complex, but it’s entirely achievable with some tech enthusiasm. Here’s a simplified breakdown:
Step 1: Choose a short domain
Select a short and memorable domain name for your URL shortener. Think “mylink.com.”
Step 2: Register your domain
Register your chosen domain through a domain registrar. Opt for a name that reflects your style. For instance, you could use a service like Namecheap to register.
Step 3: Get hosting
Choose a web hosting provider that suits your needs. This will be where your URL shortener lives. You might choose a provider like Bluehost.
Step 4: Create a database
Set up a MySQL database to store your shortened URLs and related data.
Step 5: Develop your URL shortener application
Create the user interface using HTML, CSS, and JavaScript. For the backend, use PHP to handle data and database interactions.
Step 6: Coding your URL shortener
Implement the logic to generate shortcodes, store URLs in the database, and manage redirection.
Here’s an example of how you might structure the backend PHP code for your URL shortener:
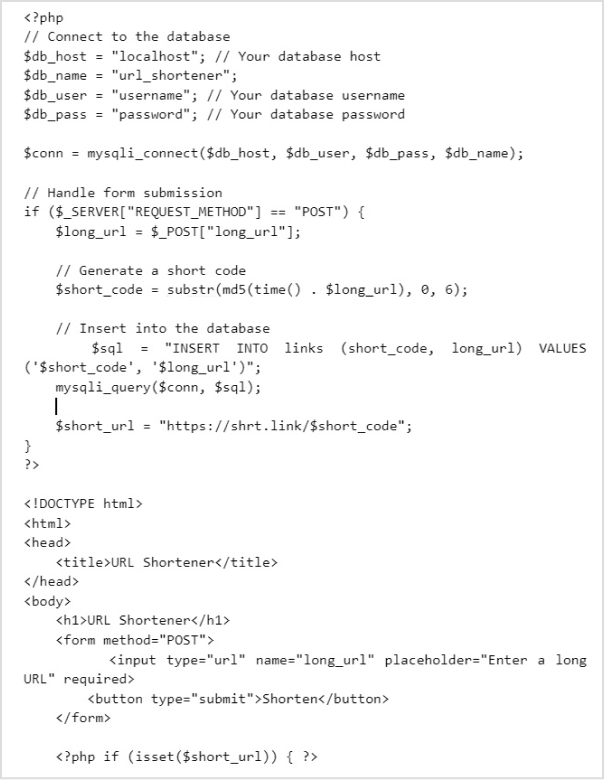
Step 7: Upload files to the hosting
Use an FTP client or hosting file manager to upload your application files.
Step 8: Configure database connection
Ensure your PHP files are properly configured to connect to your MySQL database. In the PHP code above, replace “localhost”, “username”, and “password” with your actual database host, username, and password.
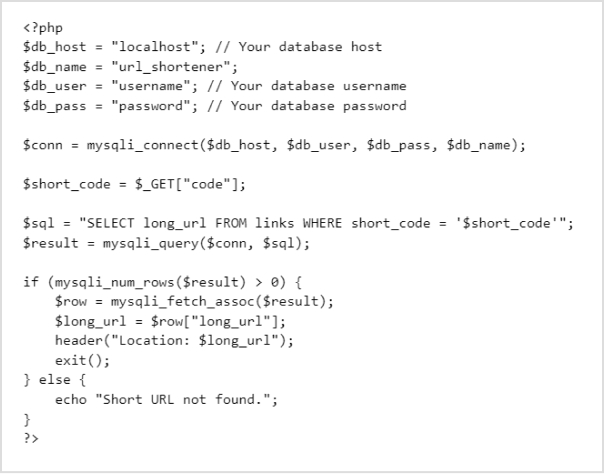
Step 9: Implement redirection
Create a redirection script to retrieve the original URL and redirect users. Create a file named “index.php” in the “url-shortener” directory.
Here’s an example of how you might implement redirection:
Step 10: Finish installation
Visit your application’s URL and test your newly created URL shortener.
By following these steps, you’ve created a simple URL shortener that allows users to input long URLs and receive shortened links. This example uses PHP and MySQL to demonstrate the process, and you can further customize and enhance your URL shortener as desired. Remember to regularly update and maintain your application for security and functionality.
Branded Short Links
Create and track branded short links for your business for better conversions.
Brand Your Links Now!
Also read: All about white label & why it can be a game changer for you!
Method 2: Get a white-label URL shortener from Replug
Another approach to creating your custom URL shortener is to utilize Replug’s white-label feature. This feature empowers you to customize the Replug experience with your branding elements, allowing you to make it uniquely yours.
Here’s a step-by-step guide to setting up your white-label URL shortener using Replug:
Step 1: Sign Up for white-label Replug
Begin by signing up for Replug and accessing your account dashboard.
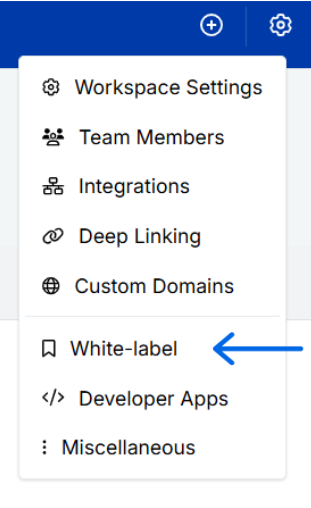
Step 2: Navigate to white-label settings
Click on the settings icon on your screen’s top right corner, and a dropdown menu will appear.
Select the “White-Label” option from the menu to access the rebranding settings.
Step 3: Configure general settings
In the general settings section, provide the following details:
- Agency name
- Favicon
- Logo
- Privacy policy URL
- Terms of service URL
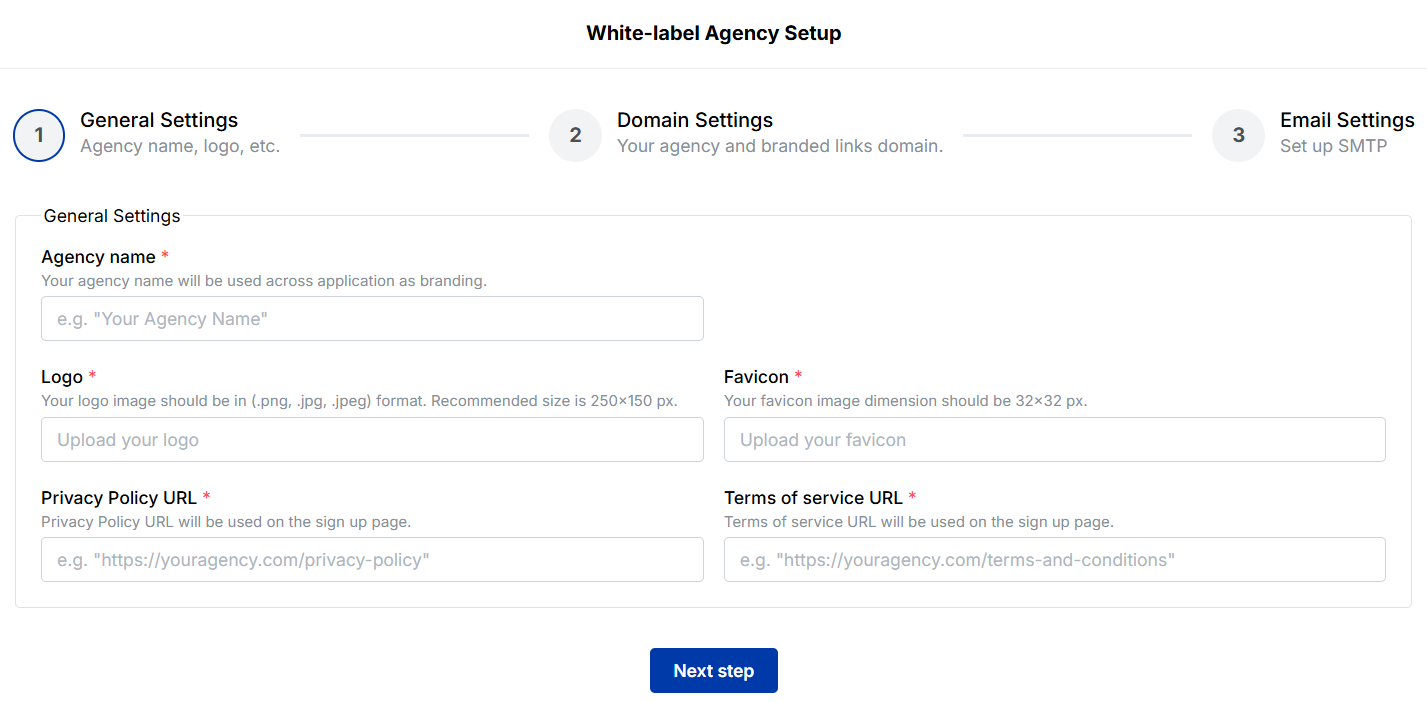
Once you’ve added these details and any branded elements, click “Next step” to confirm your general settings.
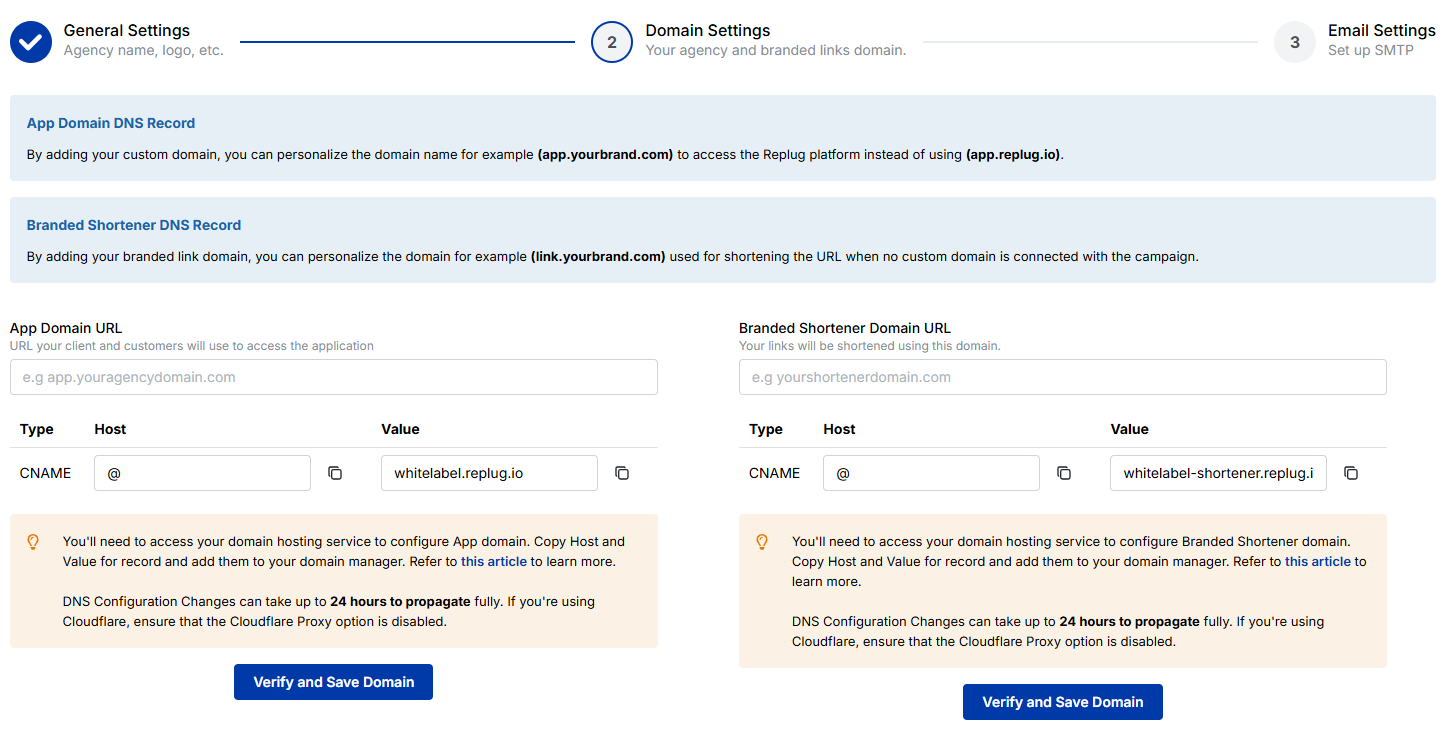
Step 4: Set up domain settings
In the domain settings section, personalize your URL shortener’s domain name. For example, you can rebrand “app.replug.io” to “app.yourbrand.com.”
Enter your agency domain name and create a CNAME record with “Whitelabel.replug.io” in the DNS settings of your custom domain.
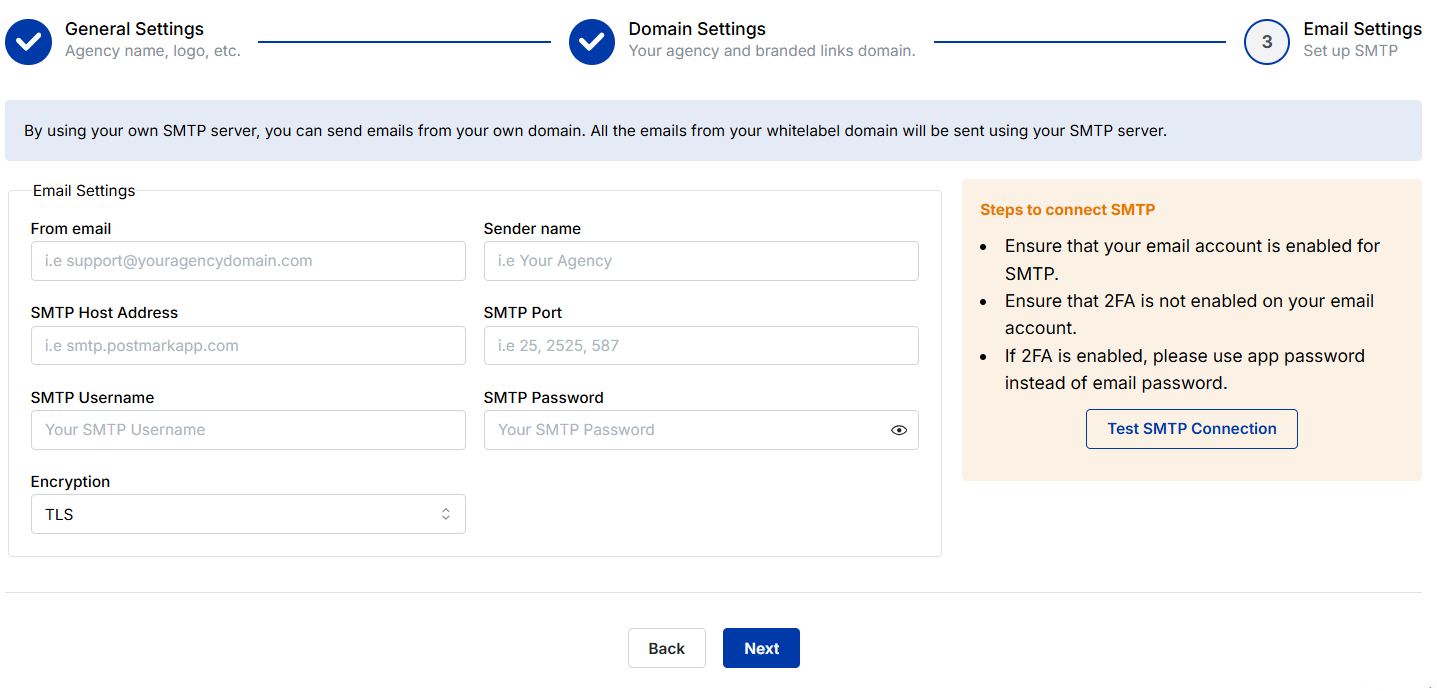
Step 5: Configure email settings
Fill in the fields in the email settings section to set up your white-label email settings:
- From email
- Sender’s name
- SMTP host address
- SMTP port
- SMTP username
- SMTP password
- Encryption
Step 6: Switch to the white-label version
Once you’ve completed the necessary settings, it’s time to switch to the white-label version of Replug.
Click on your profile name or icon at the top right corner to access the white-label version.
End note
The Replug white-label feature empowers you to infuse your branding into every aspect of the URL-shortening experience. You can create a seamless and professional extension of your brand by personalizing URLs, emails, reports, logos, and favicons.
This method is an excellent option for companies looking to expand their services without the complexity and resources required for developing new products.
With Replug’s white-label solution, you can effortlessly enhance your online presence and link-sharing capabilities.
Link Management Made Easy
Your go to link management tool for CTAs, branded and bio links, QR Codes, tracking and retargeting.
Get Started for FREE!
FAQs on URL shortener
Why should I create my own URL shortener?
Creating your own URL shortener gives you greater control over your links, branding, and analytics. It’s ideal for businesses, marketers, and anyone looking to enhance their online presence and engagement.
Do I need coding skills to create a URL shortener?
It depends on the method you choose. The DIY approach involves some coding, but there are also services like white-label Replug that offer a no-coding solution.
What’s the benefit of using white-label Replug for URL shortening?
White-label Replug allows you to customize the URL-shortening experience with your branding. You can personalize URLs, emails, reports, logos, and favicons, giving your links a professional touch.
Can I track link analytics with my own URL shortener?
Yes, many DIY solutions and services offer link tracking and analytics features. You can monitor click-through rates, audience demographics, and more.
Is setting up my own URL shortener time-consuming?
The time required depends on your chosen method. The DIY approach might take a bit more time due to coding and configuration, while services like white-label Replug offer a quicker setup.