What is a Meta Pixel?
Meta Pixel, previously known as Facebook Pixel, is a small piece of code that can be added to the back-end of a website, mobile app, or partner application to track user’s footprints, making it easier for advertisers to retarget them on Facebook.
Moreover, the Meta Pixel assists brands, organizations, entrepreneurs, and marketers with Facebook pages in determining and enhancing their return on investment from the largest social network in the world.
While e-commerce has never been this popular, social media platforms are adapting to the latest technologies and advancements.
Since Facebook is the number one social media platform with over one billion monthly active users, digital marketers and online advertisers need to tighten their grip on every aspect of Facebook ads.
In a world full of AI tools and chatbots, it’s crucial to figure out the basic online marketing techniques that could give you a slight edge over the competition.
Let’s dive deep into Meta Pixel and understand more about it.
Why is the Meta Pixel called “Pixel”?
Since Meta Pixel is a powerful analytical tool that tracks website visitors‘ activities. The way it works is that it uses a short code that leaves a cookie on each website visitor and helps advertisers track them via Facebook ads.
Pixel is the industry-standard name for retargeting code that sits on the advertiser’s website or app and provides them with insights into consumer behaviors, actions, and choices.
Meta Pixel helps identify Facebook advertisers and how users are interacting with the content or products on their website.
Installing a pixel, whether you’re running Quora ads or Facebook ads, is vital to remarketing the previous website’s visitors and understanding the audience’s behavior toward your ad.
What are the benefits of installing the Meta Pixel?
Digital marketing gurus and online advertising experts rave about retargeting and often consider it one of the most important aspects of e-commerce sales growth.
Installing the Meta Pixel in your website or app can provide various benefits that can help improve your Facebook advertising efforts – no question about it.
So let me shed some light on the capabilities and benefits of installing or using the Meta Pixel:
Essential for Facebook remarketing:
Retargeting or remarketing is the core reason why meta-pixel is a thing now. With the help of the Meta Pixel, you can track the behavior of users who have visited your website or app, and target them with specific ads to encourage them to return to your site or complete a desired action.
Track and improve conversions:
Advertisers can track user behavior on their websites or apps and analyze the effectiveness of their advertising campaigns. The data can help them identify areas where they need to improve their campaigns and optimize their ads to increase conversions.
Helps build custom audiences:
Marketers and advertisers could create custom audiences based on the actions users take on their website or app. This can help them create targeted ads for specific groups of users and improve the relevance of their advertising campaigns.
Assists in building lookalike audiences:
By analyzing the behavior of users who have interacted with your website or app, the Meta Pixel can help advertisers identify similar audiences that are likely to be interested in their products or services. It can easily expand the reach of the advertising campaigns and help target new potential customers.
Measures the results of your ad campaigns:
The Meta Pixel provides advertisers with detailed data about the performance of your advertising campaigns. They can track the number of clicks, conversions, and other metrics that help them understand the effectiveness of their ads.
Enables advertisers to show ads to the right audience:
It gets easier to track user behavior with such a facility. Therefore, the advertisers could create targeted ads that are shown to the right people at the right time. It can significantly improve the relevance of their advertising campaigns and increase the chances of users taking action.
How does the Meta Pixel work?

The Meta Pixel works by inserting a one-time code into your website or app source so that it could track the users and allows you to remarket them using Facebook retargeting ad campaigns.
To use the Meta pixel effectively, you must first install it on the website or app – wherever you’re trying to capture the audience footprints for Facebook retargeting.
The retargeting pixel goes into the header section of the website or the source code of your app and helps you monitor, analyze, and track the audience visiting the pages/sections with the code on it.
For example, an author is selling an ebook through a website and has already set up a landing page, a checkout page, and a thank you page for the campaign. The Meta Pixel would be installed on all three pages to record the buyer’s journey.
In most content management systems (CMS), the header and footer are common on all pages. Therefore, adding any piece of code into the header or footer section means it’s been added to all pages eventually.
What does Meta Pixel collect?

The Meta Pixel is a powerful tool that enables advertisers to collect valuable data that can be used to improve the effectiveness of your Facebook ad campaigns.
The data collection using Meta Pixel begins by installing the Meta Pixel on the back end of your website or app. Once it’s added, you can monitor and track conversions on the website/app.
This valuable data can be used to optimize your ad campaigns, ensuring that they are delivering the best possible results.
The reason why advertisers collect data is because of its ability to facilitate remarketing to people who have already taken some kind of action on your website.
By tracking the actions of visitors, such as adding items to a cart or completing a purchase, the Meta pixel can help facilitate the delivery of targeted ads to those individuals.
Furthermore, one of the benefits of using the Meta pixel is that it allows you to build targeted audiences for future ads. As visitors interact with your website, their actions are recorded and analyzed by the Meta pixel.
This empowers you (or the advertiser) to create audience segments based on specific behaviors or interests, which can then be used to target future ads. This process is called retargeting or remarketing.
So the Meta Pixel collects valuable information about the website visitors so that the advertiser could design or create a relevant ad campaign to target the right audience.
What are Meta Pixel Events?
Meta has provided several “Events” for conversion optimization. If you’re new to Facebook advertising jargon, then let me make it easier for you.
Events are defined as any type of action that takes place on your website after the visitor lands on the website as a result of the ad.
There are several “Standard events” which are predefined by Meta and advertisers could use them to log user activities, conversion analysis, and build an audience.
Besides the “Standard events,” there are “Object properties” that are also predefined by Meta and can be included with “Standard events” based on compatibility. For more clarification on Meta Pixel or to access the event codes, check out this page.
How to setup Meta Pixel?
Setting up the Meta Pixel is not a complex process unless you haven’t done any Facebook ad campaigns before or you never edited even a simple HTML code.
I’ll try to break down the process into brief sections so that it gets easier for an average Joe to digest, comprehend, and implement it.
Before I head over to the next part, just remember that Meta Pixel is a code that works as a cookie and helps advertisers target the website audience on Facebook.
Since you have already learned about the Meta Pixel by now, it’s important to know how you can create it. It’s not a complex process so no need to panic.
Here are the steps involved in creating a meta pixel:
Step 1: Access the ads manager
Ads Manager is a platform provided by Facebook that allows you to manage and create advertisements for your business.
To create a meta pixel, you need to first access the Ads Manager by logging in to your Facebook account and clicking on the “Ads Manager” button in the top left corner of the screen.
Step 2: Go to the events manager
Once you are in the Ads Manager, you need to navigate to the Events Manager section. This can be done by clicking on the “Events Manager” button in the left-hand menu.
Step 3 Connect a data source:
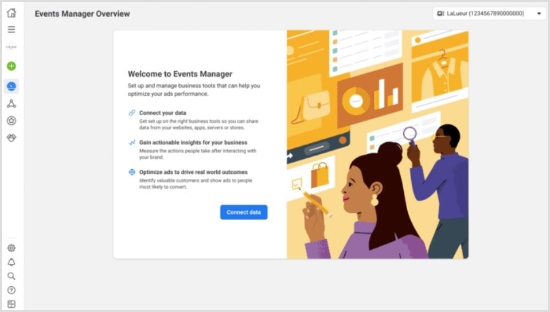
After accessing the Events Manager, you need to connect a data source. A data source can be any platform that you use to collect data related to your websites or apps, such as Google Analytics or Shopify.
By connecting a data source, you can collect information about user behavior on your website or app and use it to create targeted ads.
Step 4: Choose the data source
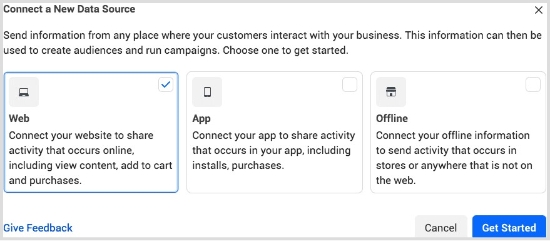
Lastly, you need to choose the data source that you want to use for creating your meta pixel. This can be done by clicking on the “Connect Data Sources” button in the Events Manager. In most cases, the data source is the website, so you’ll need to provide the URL of your website.
You may also like: How to rename a link using Replug?
Step 5: Select connection methods
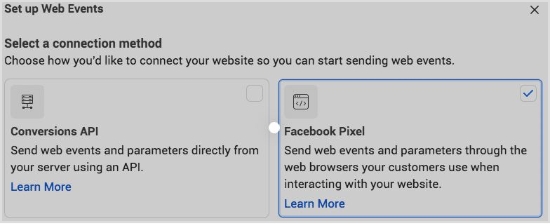
You can either connect through the Conversion API method or Facebook Pixel method. For the said case we have selected the Facebook Pixel method.
Step 6: Connect website activity using Facebook Pixel
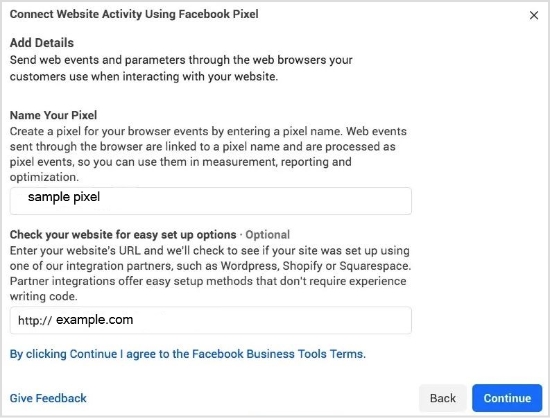
Once you have chosen the data source and followed the on-screen instructions to complete the process of creating a meta pixel, you’ll be able to generate your meta pixel for installation on your website or landing page.
How to install the Meta Pixel on your website?
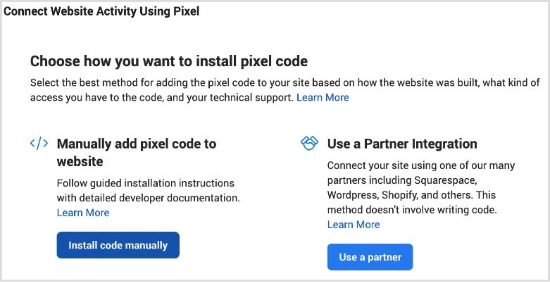
There are two basic ways of installing the meta pixel on your website.
i. Insert Meta Pixel code manually
The simple yet basic method of inserting the meta pixel code into your website is by accessing the source code of the website and putting the code into it. It’s usually done by editing the HTML or PHP file using a code editor and pasting the code into it.
Make sure to add it to the pages that need the most or else you won’t be able to track the conversion. If your website is built with PHP, you might have a header.php file, just insert the code into it and it’ll be available/accessible on every page of the website.
Below are the steps to follow to install the Meta Pixel code manually.
1.Naviagte to the Events Manager in your FB Business Suite and click the Data Sources.
2. Select the Meta Pixel you want to setup, and click Continue Pixel setup.
3. Select Meta Pixel and click Connect.

4. Select Install code manually
5. Copy the pixel base code.
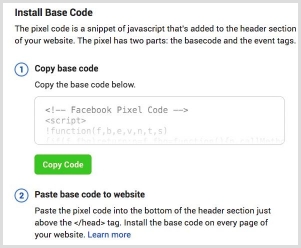

6. Paste the pixel code at the bottom of the header section above the closing header tag in your CMS or web platform.
Note: Ensure to toggle on Automatic Advanced Matching
ii. Add Meta Pixel code via Partner Integration
The second method is more convenient than the previous one. It will work only if you’re using a CMS like WordPress, Drupal, or Shopify. All you need is to edit the source file and insert the meta pixel into your website’s code.
Most people use WordPress for building their websites, blogs, and landing pages. So you could use any code insertion WordPress plugin for that matter. All you have to do is to install such a plugin and paste the code into it. The plugin would do the rest of the process of code placement on the website.
Here are some of the popular code insertion plugins:
⦁ WPCode
⦁ Woody code snippets
⦁ Header Footer Code Manager
Below video by digital marketer Jacob Lee explains the steps to add Meta Pixel code via WordPress partner integration.
Here’s a video by Metics Media explaining the steps to add Meta Pixel code via the Shopify partner integration.
How to find the Meta Pixel ID?
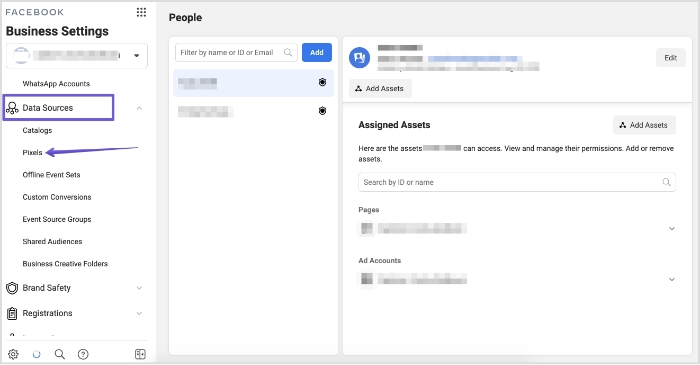
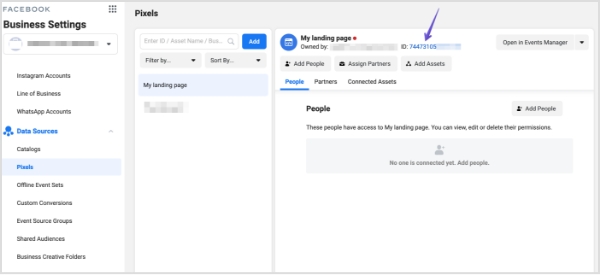
Locating the meta pixel ID might be difficult for beginners, but it’s quite simple. If you have created your meta pixel ID, then it won’t be difficult for you to find and access it.
However, if you’re new to Facebook ads, then it might seem intimidating at first. Don’t worry because I’ve got your back.
To find the Meta Pixel in the Facebook Ads Manager, you can follow these steps:
i. Log in to your Facebook account and go to the Ads Manager.
ii. Click on the hamburger menu icon (three horizontal lines) in the top left corner of the screen.
iii. Select the “Events Manager” option from the list of available options.
iv. In the Events Manager section, click on the “Data sources” tab in the left-hand menu.
v. Once you click on the data source button, you will be taken to your pixel page. Here, you can see the pixel ID, view the pixel code, and make any necessary changes to the pixel settings.
vi. If you want to use the pixel to track specific events on your website or app, you can click on the “Settings” button next to the top menu and access the specific option. This is the area that will give you access to the cookies set, event setup, and conversion API.
That’s pretty much it!
Now you have successfully found your Meta Pixel in the Facebook Ads Manager and can now use it to track user behavior on your website or app and create targeted ads.
How to setup Events using the Event setup tool?
Setting up Events is an essential step in optimizing and improving the ad campaign as it directly influences the customer base targeting. Since retargeting is all about reaching out to the audience that has shown some interest in your website, setting up the right event helps identify the intent of the website visitors.
To start using Events, you first need to set them up. Facebook has a dedicated section for Events setup, and it’s called Event Setup Tool.
Let’s head over to the Ads Manager once again for showcasing how to set up events using the Events Setup Tool. Here’s the step-by-step guide on how to do it:
Step 1: Go to the Ads Manager
The first step in setting up events using the Event Setup Tool is to log in to the Ads Manager. If you don’t have an account, you can create one for free by going to the Facebook Ads Manager.
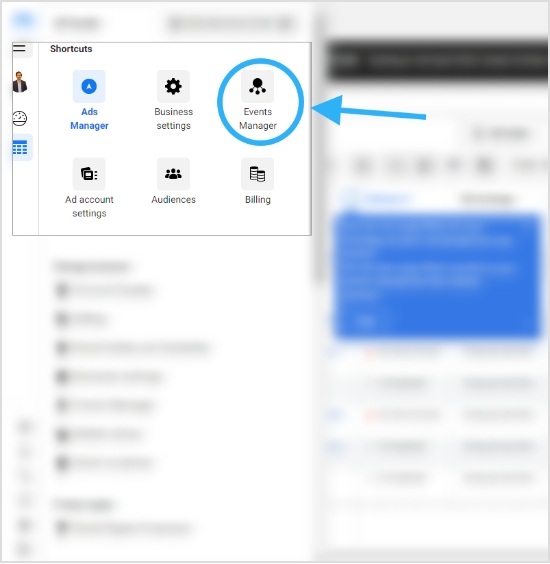
Step 2: Open the Events Manager
Once you have logged in to the Ads Manager, you will need to navigate to the Events Manager. You can do this by clicking on the hamburger icon in the top left corner of the screen and selecting “Events Manager” from the menu that appears.
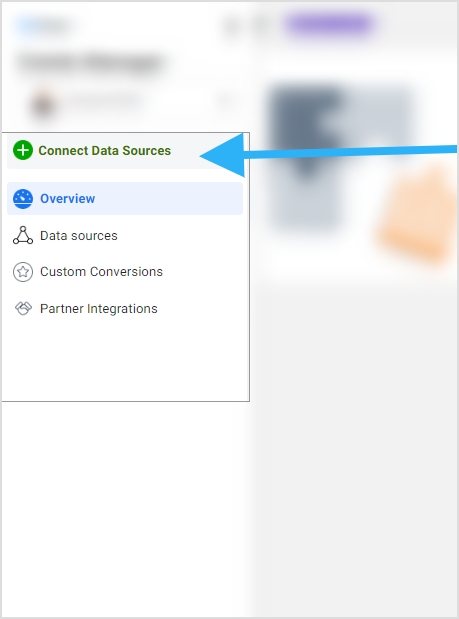
Step 3: Access the Data Sources
Once you have opened the Events Manager, you will see a menu on the left side of the screen. From here, click on “Data Sources,” which will take you to a page where you can manage your data sources, such as your website, app, or offline events.
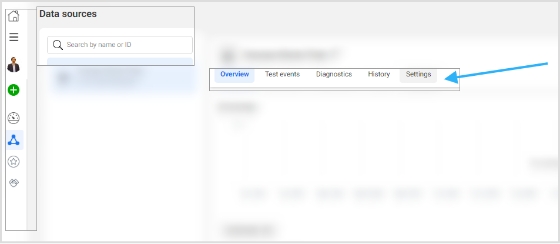
Step 4: Go to the Settings Section
After accessing the Data Sources page, you will see a list of your data sources. Select the data source you want to set up events for and click on its name. This will take you to the Settings section for that particular data source.
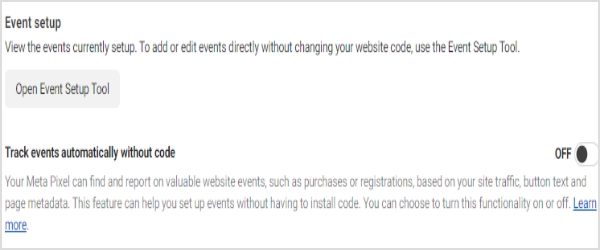
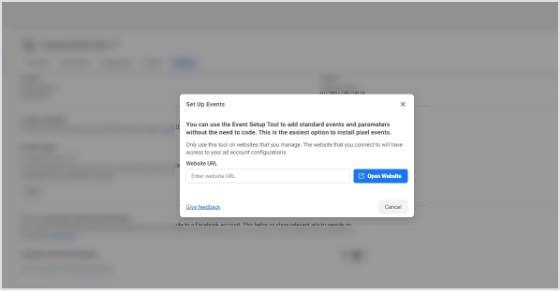
Step 5: Open the Events Setup Tool
Within the Settings section, scroll down until you see the “Events” section. Here, you will find the option to open the Events Setup Tool.
Once you click on this button, you will be taken to a page where you can create and manage the events that you want to track on your website.
How to confirm that the Meta Pixel is working using the Meta Pixel Helper?

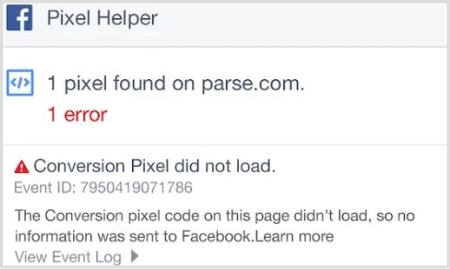
The Meta Pixel Helper is a convenient Chrome browser extension that can be used to check for the presence of Meta Pixel code on websites without any hassle.
This browser extension operates in the background and doesn’t bother the script or performance of the website. Plus, it is quite easy to install even for newbies.
After installation, an icon resembling </> – the Pixel Helper icon – will appear in the upper right corner of the browser alongside the address bar.
When a website has a Meta Pixel installed, the Pixel Helper icon will change color from grey to blue, and a badge will appear showing the number of Pixels found on the page.
If the icon does not turn blue, it means that there are no Meta Pixels installed on that particular webpage. To access the Pixel Helper, click on the Pixel Helper icon and a small popup will appear containing information that can be used to verify, troubleshoot, and improve the Pixel.
Therefore, the Pixel Helper is a helpful tool for confirming the installation or existence of the Meta Pixel on the website. To download this Chrome extension, visit this page.
How to use Meta Pixel with Replug?
Replug is a powerful URL shortener that offers several features such as URL shortening, branded short URLs, retargeting, deep links, and bio links.
You already know by now that Meta Pixel is used for retargeting people through Facebook ads. Since Replug also provides a retargeting feature, it’s time to figure out how the combo of Meta Pixel and Replug plays out.
You can use the short links created with Replug to reach out and retarget the users that click on your short URLs through Facebook ads.
Here are the steps involved in using Meta Pixel with Replug:
i. Grab the Pixel ID from Facebook

You’d surely know by now where to get the pixel ID from your Facebook account. Here’s a quick guide if it all seems intimidating or too much to digest:
- Go to the Ads Manager section and click on the Events Manager button from the options.
- Then, go to the Data Sources from the left menu and you’ll see the Facebook pixel.
- Open the settings area of your pixel and copy the pixel ID from there.
ii. Login to your Replug Account
Now go to the Replug website and log in to your Replug account.
In case, you haven’t signed up for a Replug account, I highly recommend doing it now. Replug has a 14-day free trial. Try Now!
iii. Add a Retargeting Pixel in Replug
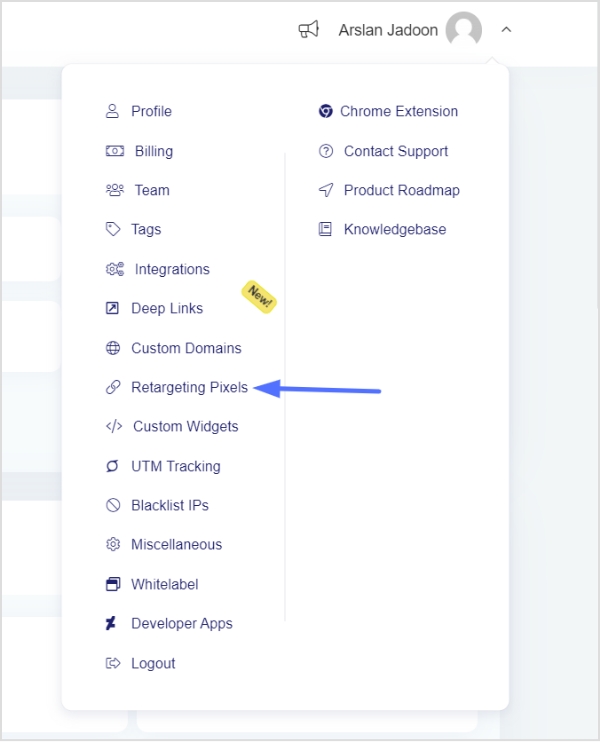
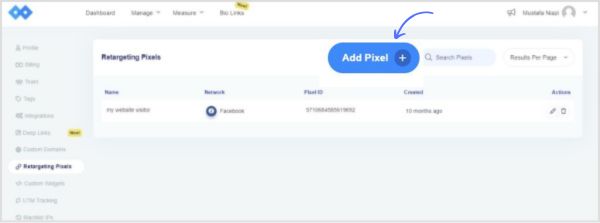

Once you’re in, access the profile settings from the top-right corner. Just click on your profile icon to do so.
A drop-down menu would appear; click on the Retargeting Pixels.
You’ll land on the Retargeting Pixels page. Now click on the “Add Pixel” button.
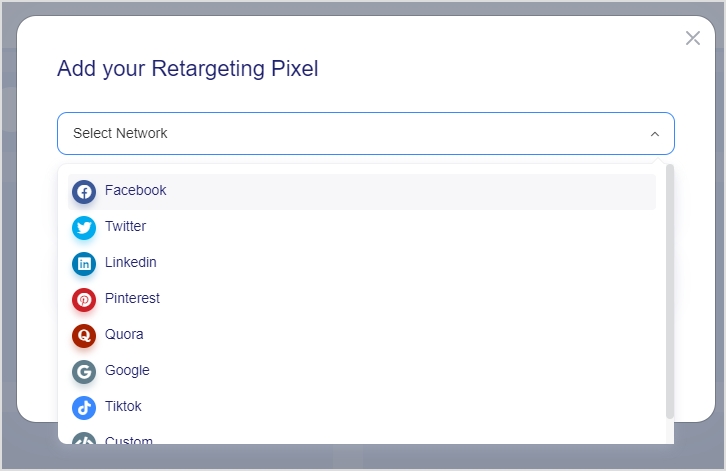
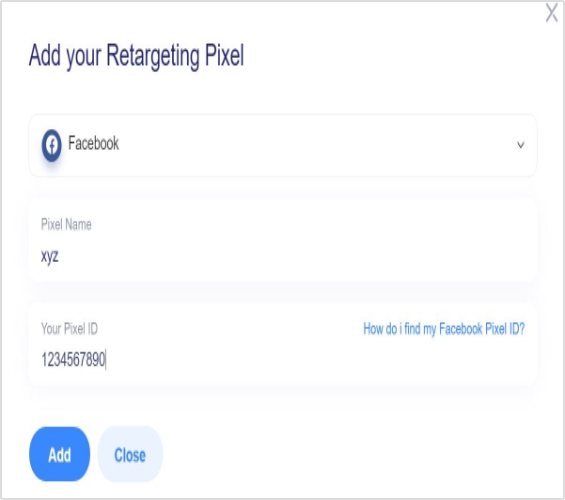
Once you click the Add Pixel button, a popup window would appear. Choose Facebook, provide your pixel name, and paste your Facebook pixel ID.
Once it’s done, click on the “Add” button to proceed.
iv. Create a retargeting campaign
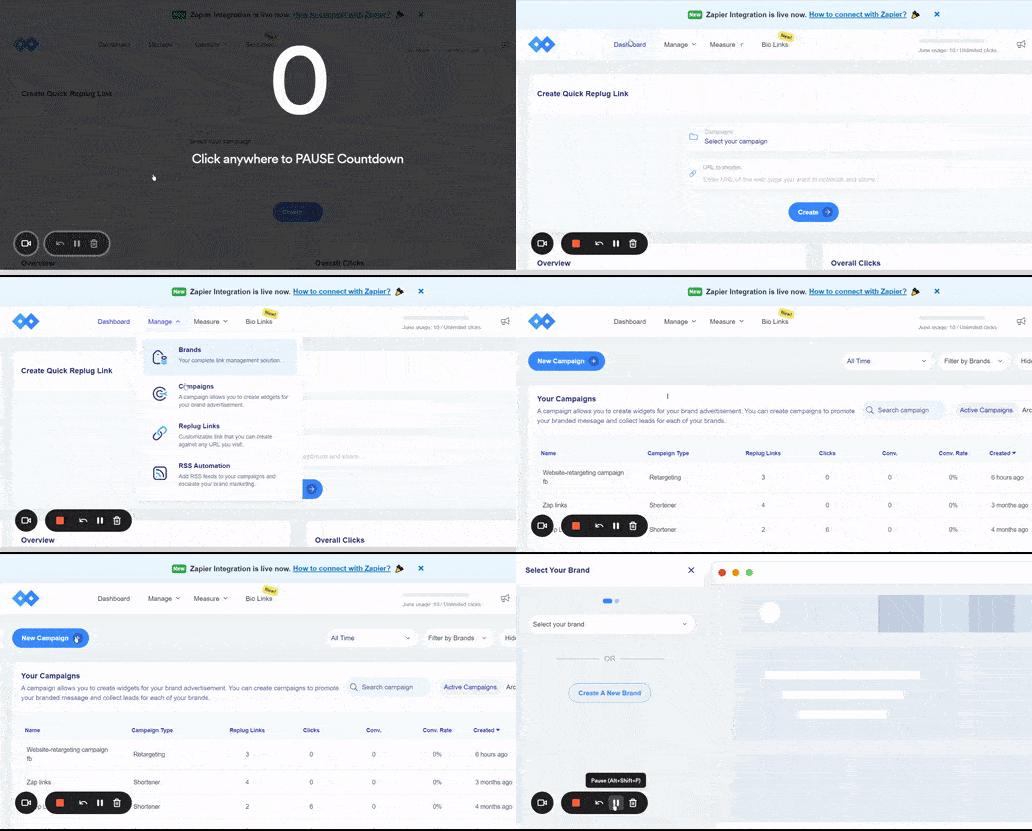
The next up is creating a new campaign for retargeting the Replug audience, meaning the visitors who click through your short links, so you could start retargeting them through Facebook ads.
To do this, go to your Replug dashboard and access the Campaign section.
Click on the “New Campaign” button to create a new campaign for this purpose.
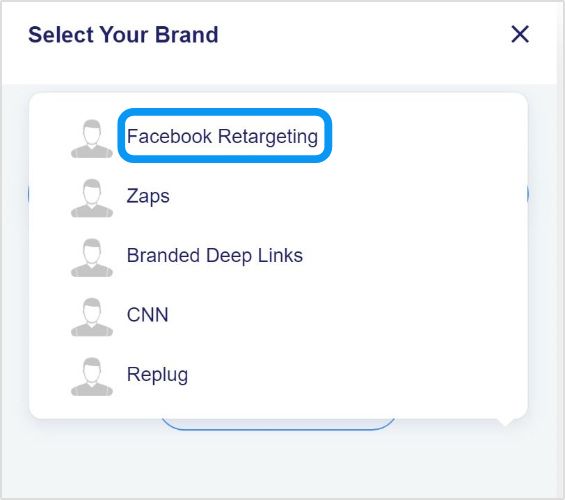
Select the appropriate brand or create a new one for this campaign.
Name this campaign and select the campaign type. You must check the “retargeting” option at this stage to let Replug know that it’s a retargeting campaign.
Choose the retargeting script afterwards.
In this case, it’ll be the one associated with Facebook. Choose the Facebook pixel you created earlier in your Replug account.
Now save the campaign and you’re done with creating a new campaign using Replug.
You may also like: 14 Crazy-Effective Ways to Boost E-commerce Sales Through Retargeting
How to change the Meta Pixel’s name?
Changing the meta pixel’s name might not be on your mind, but you should know whether or not you can do it, just in case.
It’s possible to change the meta pixel’s name. All you have to do is to follow a few simple steps to do this:
i. Go to your Ads Manager account after logging in to your Facebook account.
ii. Access the Events Manager section from the Ads Manager.
iii. Open the Data Sources to access your already created meta pixel. (Remember that you could create only one meta pixel per account).
iv. Now click on the edit button next to your meta pixel’s name. This is where you could change the meta pixel’s name.
That’s it.
Easy-peasy!
FAQs about Meta Pixel
Is meta pixel a cookie?
The Meta Pixel is a pixel code that helps advertisers target the audience who have visited their websites through Facebook ads. A cookie also does the user-tracking on the websites, but may not be directly influencing the retargeting like the meta pixel.
How do I create the Meta Pixel?
Log in to your Facebook account, go to the Ads Manager, access the Events Manager, and click on the Data Sources. You’ll see the option to create your meta pixel.
Is the Meta pixel different from than Facebook pixel?
No. The Meta Pixel and the Facebook Pixel are the same. The Meta Pixel was formerly known as the Facebook Pixel.
What is Meta pixel in Facebook ads?
It’s a pixel code that helps advertisers track the website visitors and empowers them to advertise to those visitors using Facebook ads by retargeting them.
What is a Facebook Pixel notice?
This is by no means legal advice, but a lot of countries require websites to display the cookie consent notification which tells the website visitors that this website is using cookies to track visitors.
When a website is using Meta Pixel or any other user tracking tool to track website visitors’ activity, performance, and behavior, they must notify the website visitors about this.
Have you ever seen a cookie consent notification on websites, especially when you visit it for the first time?
The website is trying to tell you that they’re using some tracking tools or softwares to track the visitors’ activities and behaviors – it’s a very common website management practice.
I’m no expert on GDPR or CCPA, so you should consult your lawyer for more clarity. However, I simply use a cookie consent WordPress plugin on my website that displays a cookie consent notification on the website.
Some several tools and plugins automatically add cookies consent notices to the websites, but here are some of the popular website plugins for this purpose:
⦁ Cookie Notice & Compliance for GDPR / CCPA
⦁ Cookies and Content Security Policy
⦁ Cookie Script
You May Also Like:
Campaign Tracking: Data-Driven Tools for Marketers
15 Proven Facebook SEO Techniques To Increase Brand Visibility


